 WinContig | Documentation
Disk clean-up dialog
This dialog allows you to delete temporary files before starting the defragmentation process. This prevents you from wasting time and system resources by defragmenting useless data.
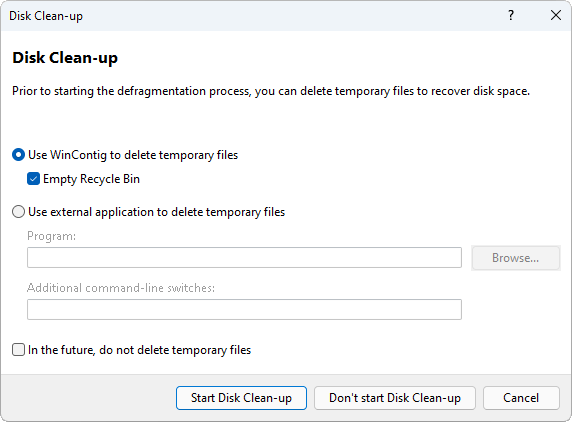
This dialog is displayed only during the defragmentation process and cannot be displayed on demand. You can enable or disable the display of this dialog in the settings of WinContig.
You can delete temporary files using either WinContig or an external application.
Deleting temporary files using WinContig
To delete temporary files using WinContig, follow these steps:
- Select the Use WinContig to delete temporary files option. If you want also to empty the Recycle Bin, select the Empty Recycle Bin option.
- Click on the Start Disk Clean-up button to start the deleting process. Once the delete operation has completed, WinContig will automatically close this dialog and continue with the defragmentation process.
Deleting temporary files using an external application
If you prefer to run an external tool to delete temporary files, follow these steps:
- Select the Use external application to delete temporary files option.
- Click on the Browse button to locate the application you want to use.
- Optionally specify any required arguments or command-line switches in the Additional command-line switches field.
- Click on the Start Disk Clean-up button to start the deleting process. Once the delete operation has completed, WinContig will automatically close this dialog and continue with the defragmentation process.
Note
WinContig will automatically use the settings that were last selected in this dialog.
If you want to skip the deletion of data only for the current session, perform one of the following actions:
- Click on the Don't start Disk Clean-up button to close this dialog and continue with the defragmentation process.
- Click on the Cancel button to close this dialog and cancel the defragmentation process.
If you don't want to display this dialog anymore, select the In the future, do not delete temporary files option prior to clicking on either the Start Disk Clean-up or Don't start Disk Clean-up buttons.