 WinContig | Documentation
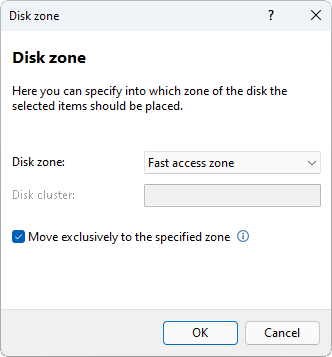
Disk zone dialog
This dialog enables you to specify into which zone of the disk the items should be placed, so that you may place the data that you access the most in the fastest zone of the hard drive, and move the least accessed data to the slowest zone of the hard drive.
In the most simplistic of descriptions, and for the purpose of the defragmentation, a mechanical hard drive can be subdivided into the following zones (based on their distance from the center of the disk):
- Fast access zone: outer tracks of the hard drive.
- Slow access zone: inner tracks of the hard drive.
To put it simply, the speed at which data can be read from the outer tracks of a mechanical hard drive is faster than the speed at which data can be read from the inner tracks. SSDs have no moving parts, so they are not affected by the physical limitations of mechanical hard drives.
To place an item into a specific zone of the disk, click on the Disk zone box and select one of the following options:
| Option | Description |
|---|---|
| Auto | Places the item in the first available contiguous run of free clusters that is large enough to contain the entire file, starting from the beginning of the disk. |
| Fast access zone | Places the item in the fast zone of the disk. For more control over the behavior of this option, see the Move exclusively to the specified zone option. |
| Slow access zone | Places the item in the slow zone of the disk. For more control over the behavior of this option, see the Move exclusively to the specified zone option. |
| User defined | Places the item in the cluster of the disk specified in the Disk cluster field. For more control over the behavior of this option, see the Move exclusively to the specified zone option. |
The Disk cluster field allows you to specify into which cluster of the disk to place a file. To enable this field, click on the Disk zone box and select User defined.
Note
If you specify a cluster number that is greater than the total clusters of the disk, WinContig will automatically correct the value to the total clusters of the disk.
The Move exclusively to the specified zone option enables you to decide if an item must be moved solely to the specified disk zone or cluster, or if an item can also be moved to a different area of the disk.
- If the option is selected, WinContig tries to move the file solely to the specified disk zone or cluster. If the file cannot be moved to the specified disk zone or cluster (for example, because the specified disk zone does not have a contiguous run of free clusters that is large enough to contain the entire file), the file is skipped.
- If the option is cleared, WinContig initially tries to move the file to the specified disk zone or
cluster. If the file cannot be moved to the specified disk zone or cluster, WinContig
tries to move the file to the first available contiguous run of free clusters that is large enough to
contain the entire file, starting from the specified disk zone or cluster. In order to indicate that this option
is cleared, WinContig shows the
 icon in the
items list.
icon in the
items list.